cooking ala mel

healthy recipes and the occasional craft

facebook instagram pinterest RSS Feed email bloglovin' goodreads
  • Home
  • About
    • Links and Resources
  • Contact
  • Recipes
    • Appetizers
    • Drinks
      • Cocktails
      • Smoothies/Milkshakes
    • Soups
    • Salads
    • Baked Goods
      • Muffins
      • Quick Breads
      • Scones/Biscuits
      • Yeast Breads
    • Breakfast
      • Donuts
      • Eggs
      • Granola/Bars
      • Oatmeal
      • Pancakes/Waffles
    • Main Dish
      • Beef
      • Chicken
      • Pasta/Grains
      • Pizza
      • Pork
      • Sandwiches
      • Seafood
    • Side Dishes
    • Sauces/Spreads
    • Gluten Free
    • Ingredients
    • Pets
    • Desserts
      • Brownies/Bars
      • Cake
      • Candy
      • Cookies
      • Cupcakes
      • Frozen Treats
      • Pies/Crumbles
      • Pudding/Custard/Sauces
    • Roundups
  • DIY
    • Crafts
    • Decorating
    • Geek
    • Homemade Gifts
  • Lifestyle
    • Things I’m Loving
    • Travel
    • Wedding

Classic Apple Pie

October 9, 2011

Last weekend, my friends and I made mini apple pies together, and ever since, I haven’t been able to stop thinking about apple pie.  This Friday night, I was eying up my bag of apples and decided I’d finally make my own.  I only had about half a stick of butter (shock!), so I had to improvise a bit and used mostly Earth Balance spread for the pie crust.  I was a little bit worried about how it would turn out, but it tasted just like I used butter.  The entire time I was rolling out the dough, my kitten sat there trying to eat it all.. even kitties can’t resist the combination of flour and butter!

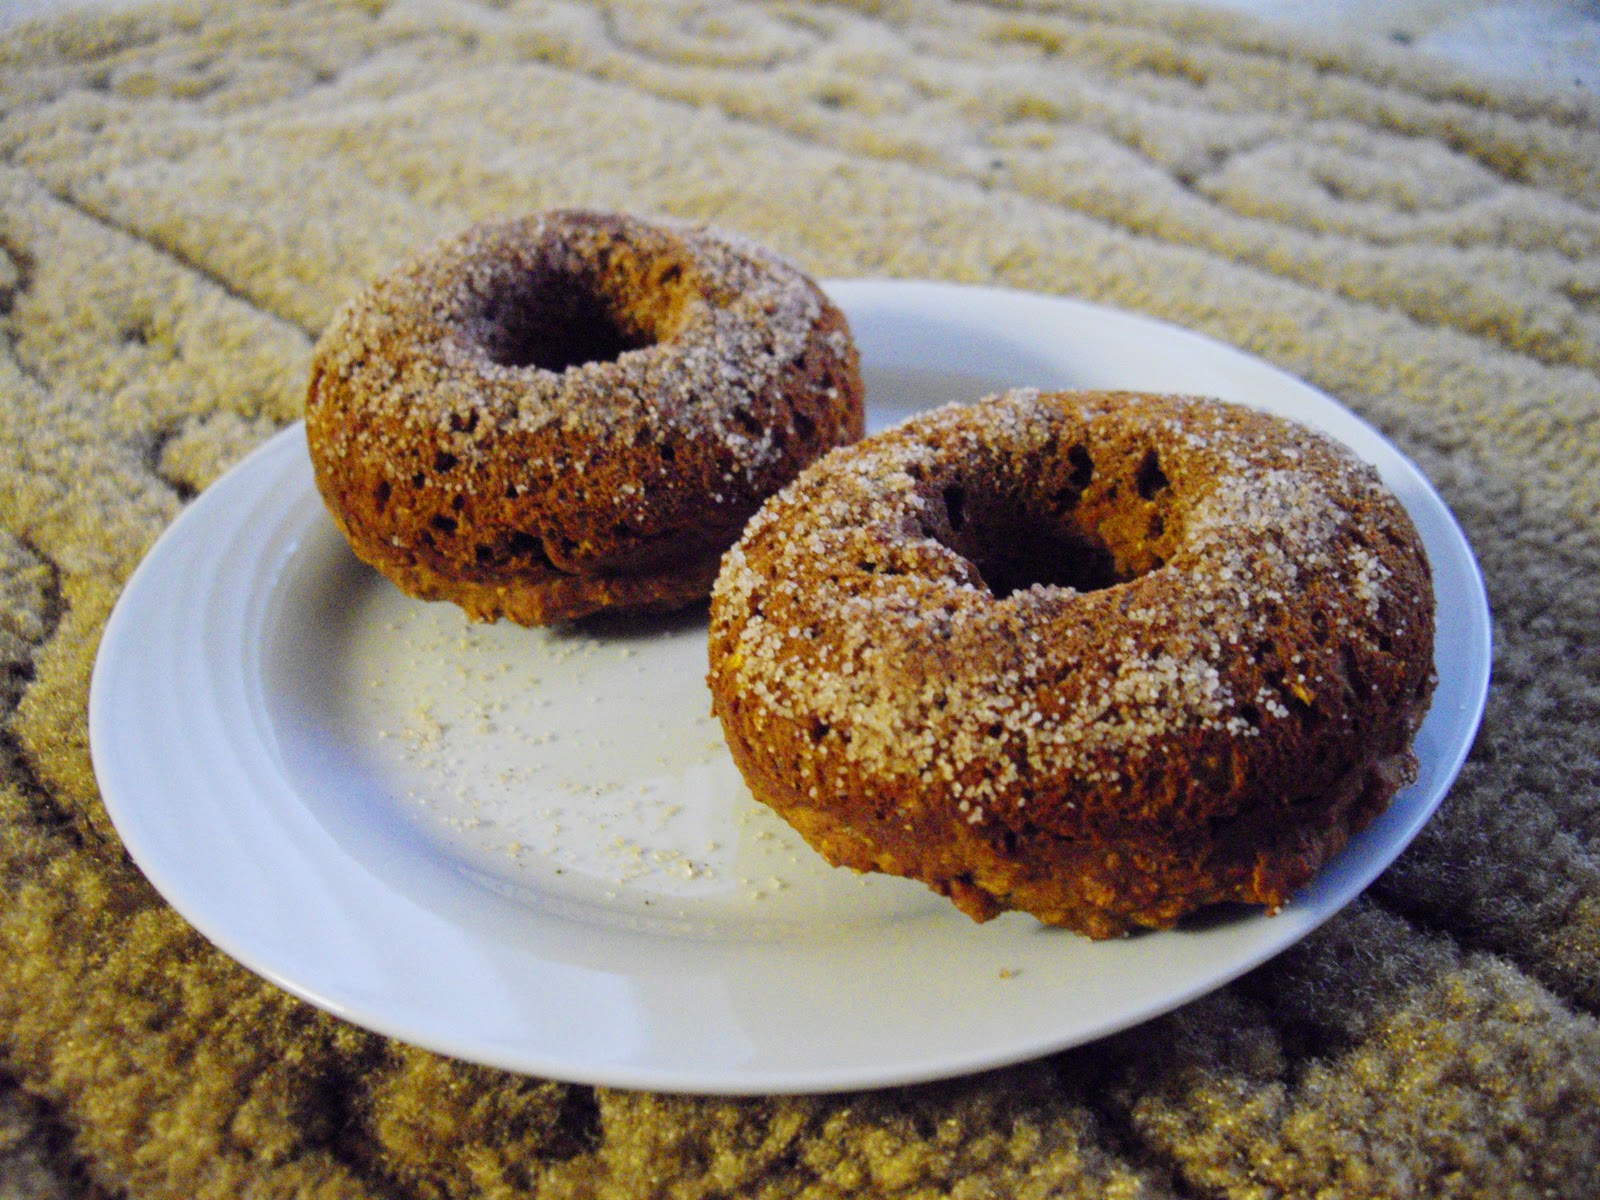
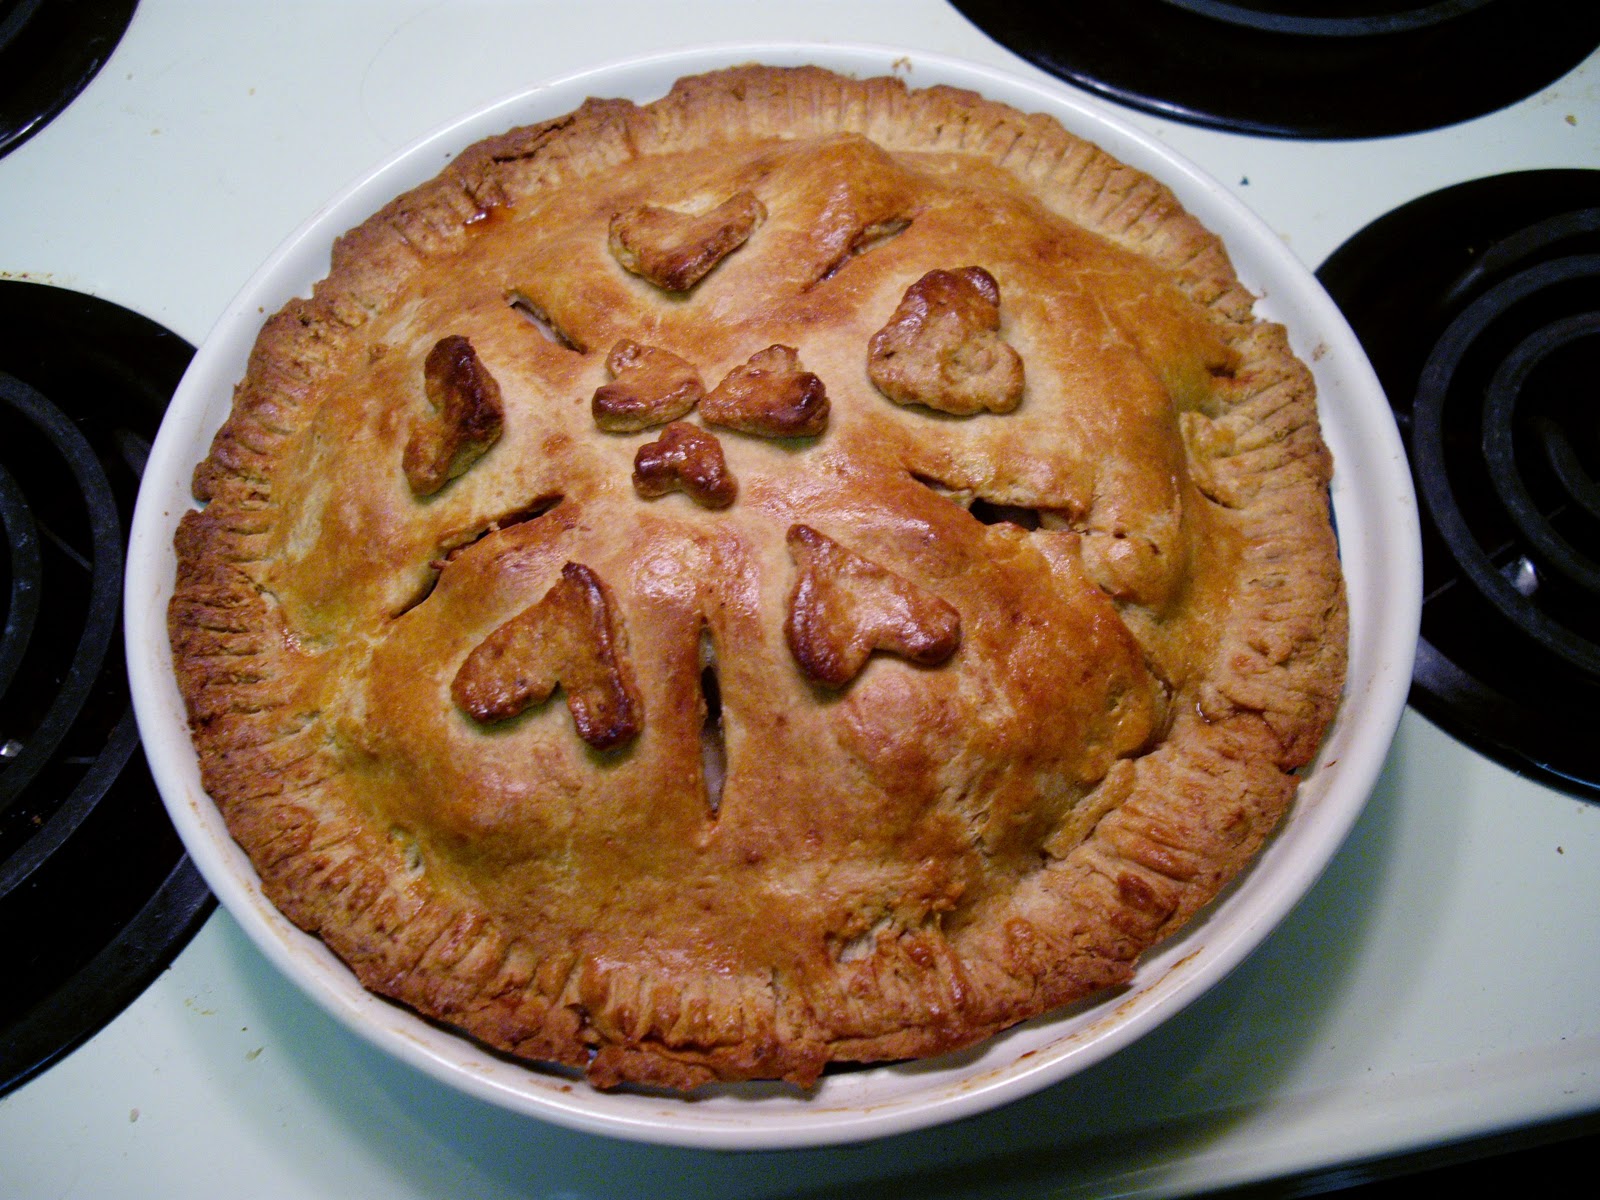
With the extra dough I had, I made little heart shapes to top the pie with.  I love how rustic they make it look!  And of course, I couldn’t wait until the pie was completely cooled, so all of the juices rushed out with the first samplings of the pie..oops.  🙂

Classic Apple Pie
yields 8 servings
 
For the crust:
2 1/2 cups white whole wheat flour
1 t salt
2 t truvia
1/4 cup butter
6 T Earth Balance
6-8 T ice water
1 egg + 1 T water, beaten
For the filling:
about 5 medium sized apples, chopped (peels on)
2 T lemon juice
1 t cinnamon
1/2 t nutmeg
1/4 t cloves
1/4 cup maple syrup
1/4 cup agave nectar
drizzle of honey
Cut the butter and Earth Balance into chunks and freeze for about 15 minutes.  In a food processor, pulse the flour, salt and truvia together.  Add in the butter/Earth Balance chunks and pulse 10 times, until crumbly.  Slowly add in the ice water and process for about 15-20 seconds, until the dough clumps together.  Shape the dough into a disk on a clean surface, wrap in plastic wrap and refrigerate for 1-2 hours.
In a medium sized bowl, combine the chopped apples, lemon juice, spices, maple syrup and agave nectar and toss to combine.  Set aside.
Preheat the oven to 400ºF.  Roll half of the pie dough on a lightly floured surface into a 12 inch round.  Gently press the dough into the pie plate, with the edges overhanging the pie plate.  Spoon the apples into the crust evenly and then drizzle with honey.  Roll out the remaining pie dough and place overtop the apples.  Cut away the extra crust until it is about 1/2 inch over the lip of the plate.  Pinch the two pie crust layers together, tucking the dough underneath itself to it is in line with the lip of the plate.  Seal with the tines of a fork.  If there is any dough leftover, make shapes and place on top in a cute design.  Make 4-5 slits in the pie crust and brush with egg wash.
Bake for about 25 minutes, until lightly golden.  Reduce the temperature to 375ºF and bake for about 10-15 minutes more, until juices are bubbling.  Cool and then serve!

Leave a Comment

Baked Pumpkin Spice Donuts

October 2, 2011

So..It’s been a really long time since I’ve posted anything on here.  Almost two months, actually.  And really, all I can say by way of excuses is that pharmacy school is intense.  When I’ve been lucky enough to have time to bake or make any sort of food other than the quick eggs and toast or haphazardly thrown together pasta dish, I’ve been also in the midst of studying for my next exam, so I never thought to take pictures, and I’ve really been hardly making anything new.

It wasn’t until my sister asked me to update the blog that it really hit me how long it’s been.  So of course, with the start of October, it’s already rather chilly, and all I’ve wanted are some warm fall treats.  I already stocked up on pumpkin (as I’m sure many of you have as well), so today, instead of turning on the heat, as I probably actually should, I turned on my oven to make some pumpkin spice donuts.  The smells of fall filling my apartment were just what I needed.

Coated in a lovely cinnamon/nutmeg sugar, these donuts are the perfect fall treat for breakfast before class, or anytime, really.  With the first wave of exams this semester being complete, and it being a time of year filled with so many goodies, I’m sure I’ll be back to updating the blog on a more regular basis.  A few of my friends and I have planned to go apple picking, so of course that’ll come with plenty of deliciousness!  Stay tuned; I haven’t disappeared forever! 🙂

Baked Pumpkin Spice Donuts
yields about 15 donuts


2 1/2 cups white whole wheat flour
1 cup wheat bran
1 1/2 t baking soda
1/2 t baking powder
1 t salt
2 t cinnamon
1/2 t nutmeg
1/2 t cloves
3 cups pumpkin puree
2 eggs
2/3 cup truvia
1/3 cup agave nectar
cinnamon/nutmeg sugar, for dipping

Combine the flour, wheat bran, baking soda, baking powder and spices in a small bowl.  Lightly beat the eggs into the pumpkin, and then add the truvia and agave nectar.  Mix well.  Slowly add in the flour mixture and stir until fully incorporated.  Do not over mix!  Spoon (or pipe) the batter into a greased donut pan.  Bake for 12-15 minutes at 350ºF, until it springs back when lightly touched (and lightly browned).  Allow to cool in the pan for about ten minutes and then remove to a wire rack to cool.  Dip in the cinnamon/nutmeg sugar mixture and serve.

Leave a Comment

Strawberry Banana Streusel Bread

August 8, 2011

I love having berries ready to eat in my fridge all the time – I’m going to be so sad once berry season is over!  But even though I can eat berries until I’m sick to my stomach, I always end up with a few too ripe strawberries that look a little too yucky to eat – just like I always end up with bananas I don’t want to eat.  This is when I make wonderful breakfast treats out of them!  Strawberry banana bread, this time.  With streusel.  Because who would ever say no to streusel?!

This bread was moist, nutty, slightly sweet and full of that strawberry banana flavor that’s absolutely to die for.  This bread is perfect for breakfast, snack, dessert.. I had to hide it away in the fridge so I wouldn’t eat it all at once!

Strawberry Banana Streusel Bread
makes 1 loaf
For the bread:
1 1/2 cups white whole wheat flour
1 t cinnamon
1/2 t nutmeg
2 t baking powder
1 t baking soda
3 ripe bananas
2 eggs
1 1/2 t vanilla
1/2 t salt
1/2 cup unsweetened applesauce
1/3 cup agave nectar
3/4 cup almonds and pecans, chopped
1 cup strawberries, hulled and roughly chopped
For the streusel topping:
2 T whole wheat flour
3 packets truvia
1 t cinnamon
1/4 cup chopped pecans
1 T smart balance spread

For the bread:

In a medium bowl, combine the flour, cinnamon, nutmeg, baking powder and baking soda. In a separate bowl, mash the 3 bananas with a fork until slightly chunky. Stir in the eggs, vanilla and salt. Add in the applesauce and agave nectar and mix thoroughly. Pour the banana mixture into the flour mixture, and mix until fully incorporated. Fold in the strawberries and nuts. Pour the batter into a loaf pan lined with parchment paper (or greased lightly) and smooth with a spatula.

For the streusel topping:
Whisk together the flour, truvia, cinnamon and nuts.  Rub the smart balance in with your fingers until it resembles coarse crumbs.  Sprinkle over top of the smoothed batter evenly.
Bake for 40-45 minutes at 350ºF, until toothpick comes out clean. Allow to cool in the pan for about 10 minutes, and then remove to a wire rack to cool completely. Serve at room temperature. Keep well wrapped in the fridge for a week or at room temp. for two days.

Leave a Comment

  • « Previous Page
  • 1
  • …
  • 102
  • 103
  • 104
  • 105
  • 106
  • …
  • 142
  • Next Page »
Welcome to
cooking a la mel!
I'm Melinda, a baking, fitness, and reading-obsessed pharmacist, crazy cat lady, and geek. This is my little place on the internet to share mostly healthy recipes and the occasional geeky craft. I am all about balance in every aspect of life, especially when it comes to food! More>>

recent reader favorites

_blank
_blank
_blank
_blank
_blank
_blank
_blank
_blank

mel’s current favorites

_blank
_blank
_blank
_blank
_blank
_blank
_blank
_blank
Copyright © 2024 Cooking a la Mel | Privacy Policy

facebook instagram pinterest RSS Feed email bloglovin' goodreads